通过 Flask, Docker, Jenkins 和 Kubernets 部署机器学习模型
本文主要介绍部署机器学习模型的一种自动化方式,如题所示,通过 Flask,Docker, Jenkins 和 Kubernets 实现。基本原理就是通过 Flask 提供 RESTful API 接收客户端的 predict 请求,然后将这个服务打包成一个 docker image 便于部署和迁移,当代码或模型更新时通过 Jenkins 触发自动构建新的 docker image,而通过 kubernets 管理容器则让整个服务具备伸缩性和可靠性。本文主要参考了 Deploy a machine learning model in 10 minutes with Flask, Docker, and Jenkins,并在其基础上进行了完善和拓展,如通过一个简单的 shell script 实现 jenkins 的触发功能,并添加了 kubernets 部分的介绍等。本文的对应的所有代码可从 DeployMachineLearningModel 获取。
下文基本可以依样画葫芦走一遍,为了避免不必要的麻烦,尽量不要在 windows 下配置,虽然上述这些工具也提供了 windows 的版本,但是使用起来总是出现各种问题;也不要在 win10 的 wsl 中配置,因为 docker 涉及到了 linux 底层的 cgroup,在 wsl 中并不能直接安装 docker。本文的实验时最开始为了方便在上面提到的两个环境中进行了实验,结果是折腾了好久,最后通过在 virtual box 中的 ubuntu 16.04 进行以下的实验。
下图摘自文章前面提到的 Deploy a machine learning model in 10 minutes with Flask, Docker, and Jenkins,从中可以看到清晰看到整个部署和访问的流程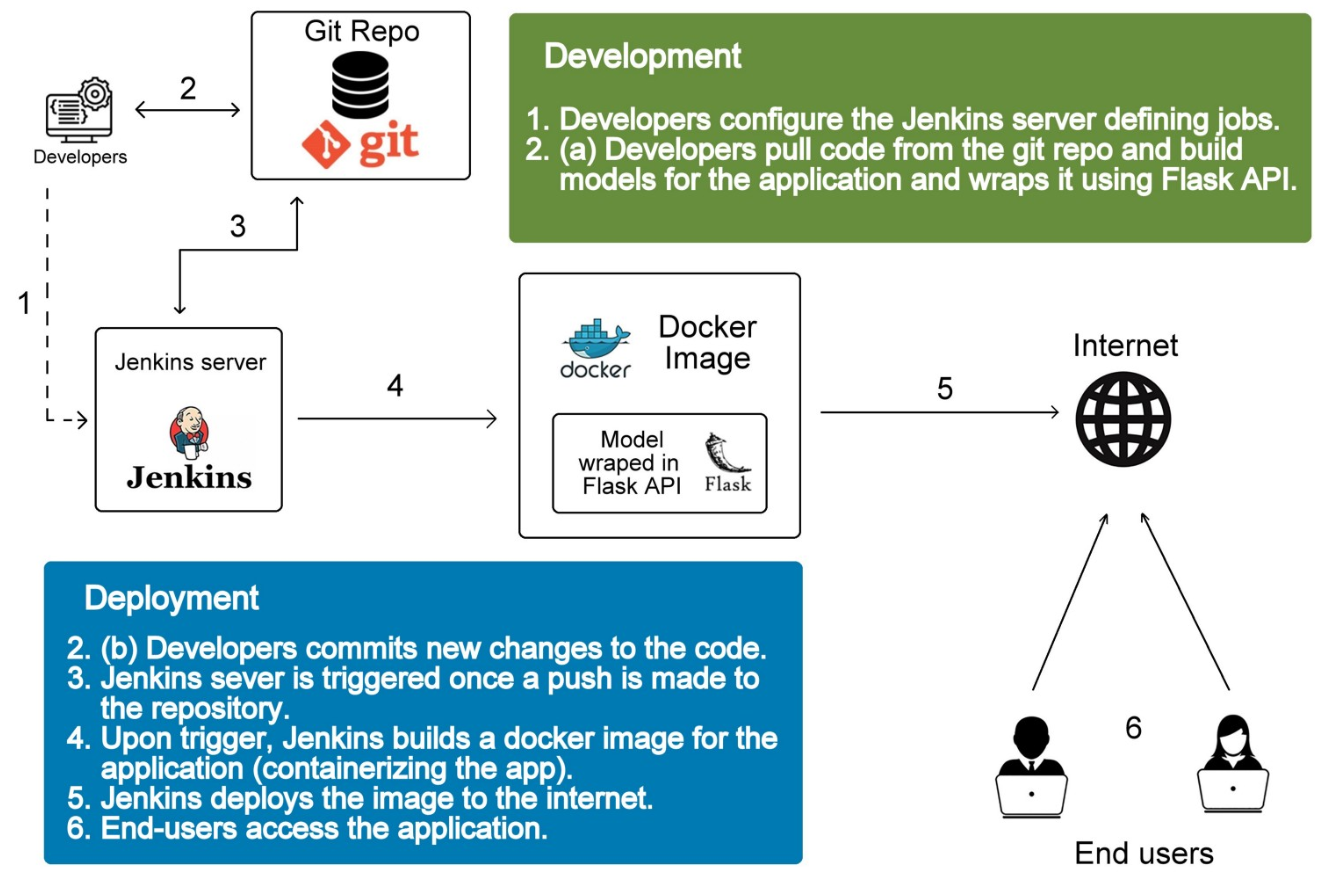
Flask 提供 RESTful api
Flask 的作用主要是提供 RESTful api 供客户端进行 predict,像 Google、Microsoft、Face++ 这些公司提供的 AI 服务(即人脸识别,表情识别等),基本都是通过 RESTful api 提供的,其基本原理是客户端将通过 POST 请求将需要预测的样本发送到服务器,然后服务器提取样本进行预测并返回结果;且通常还需要附带 id 判别身份,从而进行相应的扣费,这里为了简单起见不会去考虑这些问题。
通过 Flask 能够非常简单地在搭建一个 HTTP Server 并在指定端口监听,如果接收到 POST 请求便调用模型进行预测并返回,因此首先需要训练模型并将训练好的模型 load 进内存,为了简单起见,这里的任务是 sklearn 内置的 iris 分类。
训练并保存模型
训练并持久化模型的代码如下所示,对应 train_model.py 文件1
2
3
4
5
6
7
8
9
10
11
12
13
14
15
16
17
18
19
20
21
22
23
24
25
26
27# coding: utf-8
import pickle
from sklearn import datasets
from sklearn.model_selection import train_test_split
from sklearn import tree
# simple demo for traing and saving model
iris=datasets.load_iris()
x=iris.data
y=iris.target
#labels for iris dataset
labels ={
0: "setosa",
1: "versicolor",
2: "virginica"
}
x_train, x_test, y_train, y_test = train_test_split(x, y, test_size=.25)
classifier=tree.DecisionTreeClassifier()
classifier.fit(x_train,y_train)
predictions=classifier.predict(x_test)
#export the model
model_name = 'model.pkl'
print("finished training and dump the model as {0}".format(model_name))
pickle.dump(classifier, open(model_name,'wb'))
加载模型并提供调用 api
通过 Flask 能够快速启动一个 http server 并在不同的访问路径设置不同的处理函数,详细语法可参考官网教程。
本文的例子很简单,如下代码所示(对应源文件 server.py),首先把模型 load 进内存,然后设置了访问路径为 /api 时调用模型进行 predict,为了简单起见这里没做输入数据的检查和异常处理;最后 app.run 启动了一个 server 并默认监听在 5000 端口。1
2
3
4
5
6
7
8
9
10
11
12
13
14
15
16
17
18
19
20
21
22
23
24# coding: utf-8
import pickle
from flask import Flask, request, jsonify
app = Flask(__name__)
# Load the model
model = pickle.load(open('model.pkl', 'rb'))
labels = {
0: "versicolor",
1: "setosa",
2: "virginica"
}
def predict():
# Get the data from the POST request.
data = request.get_json(force = True)
predict = model.predict(data['feature'])
return jsonify(predict[0].tolist())
if __name__ == '__main__':
app.run(debug = True, host = '0.0.0.0')
利用以上两个文件,通过命令 python train_model.py && python server.py 便可训练出一个模型并通过 http server 提供访问 api。
客户端要进行预测时可通过如下代码(见源文件 client.py), 这里的 192.168.31.78 是我的实验环境里面启动 httpserver 的机器 ip(client.py 里面使用的是 8000 端口,因为利用了 docker 进行了端口映射,后文会对这一点进行讲解)1
2
3
4
5
6
7
8
9
10
11
12
13# coding: utf-8
import requests
# Change the value of experience that you want to test
url = 'http://192.168.31.78:5000/api'
feature = [[5.8, 4.0, 1.2, 0.2]]
labels ={
0: "setosa",
1: "versicolor",
2: "virginica"
}
r = requests.post(url,json={'feature': feature})
print(labels[r.json()])
在同一局域网的机器运行上面的代码便能输出 setosa 这个预测结果
Docker 打包和运行程序
Docker 的安装参考 Get Docker CE for Ubuntu, 这里不再赘述
打包
利用 Docker 可以将上述部署的环境打包成一个 image,便于部署、迁移和弹性扩展(配合 Kubernets 使用),因此下文主要描述如何通过 Dockerfile 构建 image,关于 Dockerfile 的详细语法可参考 文档,这里只列出本文用到的一些语法。
类似 shell 脚本,Dockerfile 里面是一系列的指令,作用是让 Docker 通过 Dockerfile 和 docker build 命令自动构建出目标 image。
在执行 docker build 命令时通过 -t 指定生成的 image 的 tag,能够保存生成的 image,如 docker build -t shykes/myapp .,最后的 . 表示 Dockerfile 的目录,即这条命令是在 Dockerfile 所在目录下执行
Dockerfile 的基本原理是首先通过 FROM 命令获取一个基本的 image,然后在这个 image 基础上通过各种命令配置好我们运行程序需要的环境,接着把我们的源文件复制到 image 里,进行构建和运行。
Dockerfile 中值得注意事项如下,为了保持原意这里不进行翻译
- each instruction is run independently, so
RUN cd /tmpwill not have any effect on the next instructions - basic syntax is
INSTRUCTION arguments, the instruction is not case-sensitive. However, convention is for them to be UPPERCASE to distinguish them from arguments more easily. - A Dockerfile must start with a
FROMinstruction. The FROM instruction specifies the Base Image from which you are building FROMcan appear multiple times within a single Dockerfile to create multiple images or use one build stage as a dependency for another- Docker treats lines that begin with # as a comment
RUN <command>(the command is run in a shell, which by default is/bin/sh -con Linux orcmd /S /Con Windows- There can only be one
CMDinstruction in a Dockerfile. If you list more than one CMD then only the last CMD will take effect. RUNv.sCMD.RUNactually runs a command and commits the result;CMDdoes not execute anything at build time, but specifies the intended command for the image.- The
WORKDIRinstruction sets the working directory for anyRUN, CMD, ENTRYPOINT, COPYandADDinstructions that follow it in the Dockerfile. If theWORKDIRdoesn’t exist, it will be created even if it’s not used in any subsequent Dockerfile instruction COPY <src>... <dest>; TheCOPYinstruction copies new files or directories from<src>and adds them to the filesystem of the container at the path<dest>;The<dest>is an absolute path, or a path relative toWORKDIR, If<dest>doesn’t exist, it is created along with all missing directories in its path.ADD <src> <dest>; TheADDinstruction copies new files, directories or remote file URLs from<src>and adds them to the filesystem of the image at the path<dest>COPYv.sADD.COPYonly lets you copy in a local file or directory from your host (the machine building the Docker image) into the Docker image itself.ADDlets you do that too, but it also supports 2 other sources. First, withADDyou can use a remote URL instead of a local file / directory. Secondly, you can extract a tar file** from the source directly into the destination.- Environment variables (declared with the
ENVstatement) can also be used in certain instructions as variables to be interpreted by the Dockerfile; Environment variables are notated in the Dockerfile either with$variable_nameor${variable_name}
因此,构建上述的环境的 Dockerfile 如下所示,参考链接中的 Dockerfile 中有两个 FROM 语句,分别表示 ubuntu 环境和 python 环境,且需要安装 pip 等工具,这里直接通过 nitincypher/docker-ubuntu-python-pip 提供这些功能1
2
3
4
5
6
7
8
9
10
11
12# train and run the model with RESTful api
FROM nitincypher/docker-ubuntu-python-pip
COPY ./requirements.txt /app/requirements.txt
WORKDIR /app
RUN pip install -r requirements.txt
COPY . /app
CMD python /app/train_model.py && python /app/server.py
实验的项目路径为 /opt/src/DeployMachineLearningModel, 则构建 image 的命令为 docker build -t deploy_ml_model ., 其过程如下所示,可以看到
1) 构建前系统的 docker images 情况,由于之前已经运行过这条命令,因此依赖的 nitincypher/docker-ubuntu-python-pip 也已经 pull 到本地了。如果是第一次运行,则下载 nitincypher/docker-ubuntu-python-pip 需要一定的时间 2) Dockerfile 中每条命令都是运行时的一个 step,在构建时不会运行 CMD 的命令,而是通过 docker run 时才执行
构建完成后可以看到系统中的多了 deploy_ml_model 这个 image
运行
接着需要运行这个 image,运行的 container 内部 Flask 在监听 5000 端口,因此需要通过端口映射为外部机器可见的端口,通过命令 docker run -p 8000:5000 deploy_ml_model 可通过运行 docker 的机器的 8000 端口访问 container 内部提供的 api,如下所示
将上面的客户端的代码的端口改成 8000 便是 client.py 源文件了,运行 client.py 结果如下所示,
此时的 server 接收到一个 POST 请求,输出的日志如下
如果需要停止运行的 container,通过 docker stop 并指定 container 的 id 即可, container id 并不需要全输入,只需要输入能系统能区分不同 container 的程度即可。该过程如下所示
Jenkins 或自定义脚本触发自动构建
上面的构建流程中,只要每次代码或模型有更新便需要重新手动执行 docker build 和 docker run, 而通过 jenkins 或自定义的脚本便能让这个流程自动化,这个过程需要结合 Github 实现,即当代码仓库有更新时,便自动构建新的 image。
其基本原理是 Github 在 repository 发生变化时,会向指定的 url 发送一个 POST 请求告知 repository 有更新,只要我们监听这个 url 并在收到这个 POST 请求时进行更新即可,这个机制在 Github 中被称为 WebHooks。Github 提供的 WebHooks 中涵盖了多种更新情况,不同的更新对应于不同的 event,可以在 Github 中自定义需要触发的事件,默认触发的是 PUSH 事件(如 commit、PR 等)。
Jenkins 自动构建
Jenkins 在 Ubuntu 下的安装参考 Installing Jenkins,这里不再赘述
Jenkins 是一个功能齐全的自动化构建工具,类似 Docker 通过 Dockerfile 定义 image 的构建过程,jenkins 也能通过 Jenkinsfile 定义工程的构建过程。
但是本文只用到其接收到 Github 发送的 POST 请求并触发其重新构建的功能,其配置流程如下,首先新建一个自由风格的项目,并配置其为 Github 项目,管理源码的方式为 git,如下所示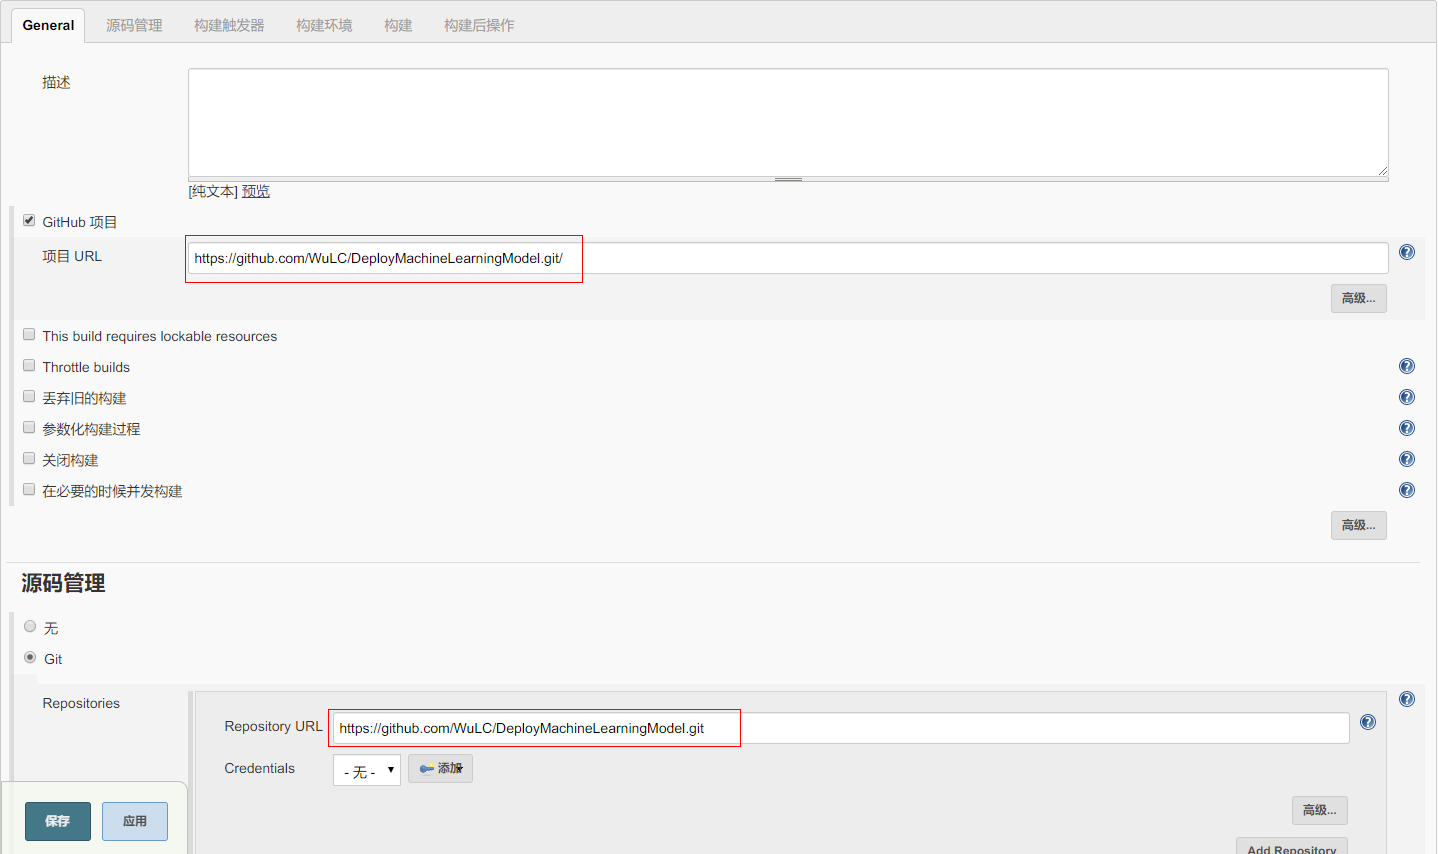
然后配置触发方式和构建的命令如下图所示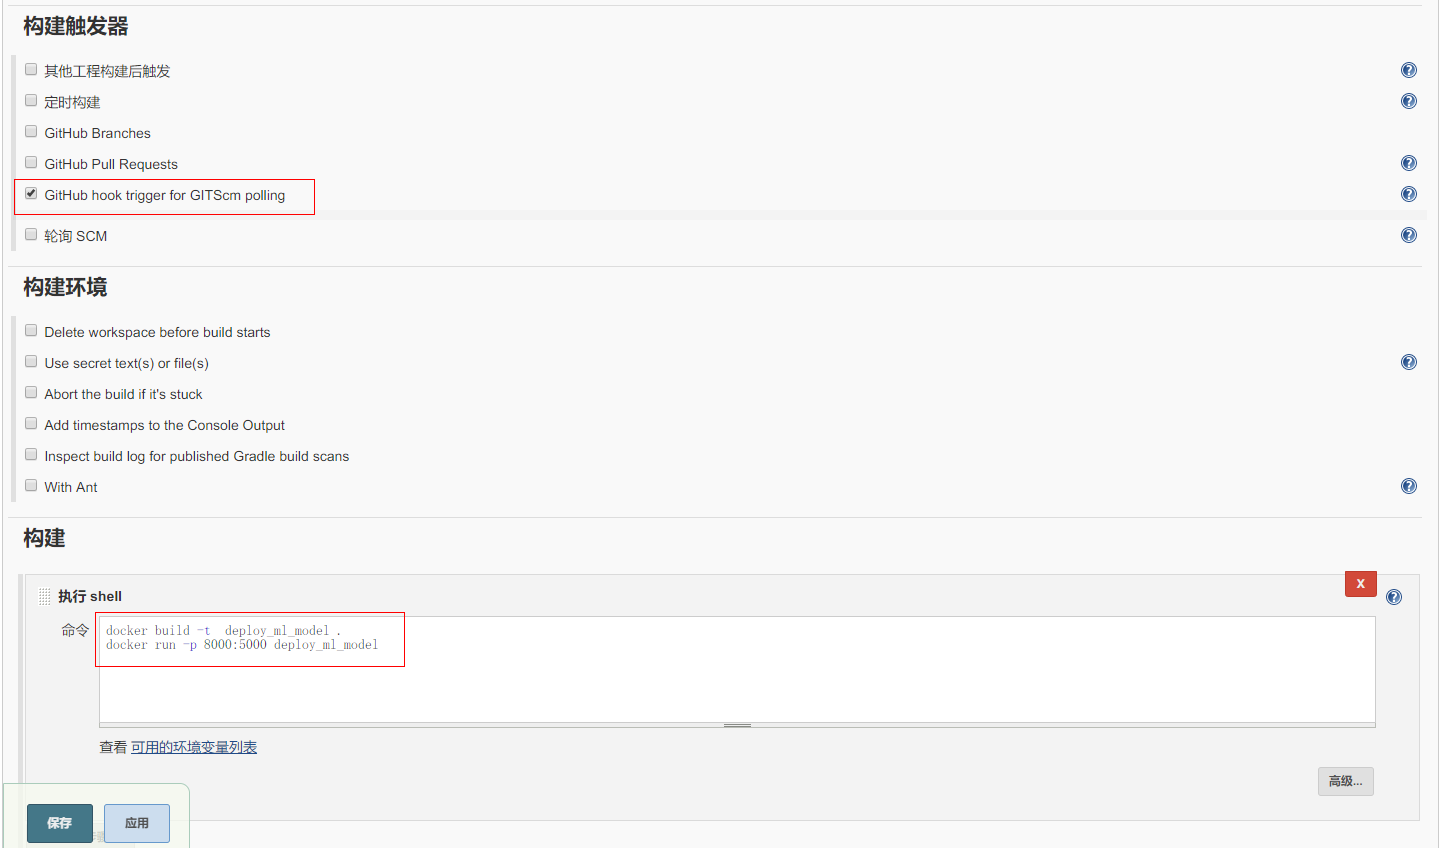
配置并保存后便可直接 “立即构建” 进行项目的构建,jenkins 会自动下载仓库并进行构建,通过控制台输出可以看到构建过程,该过程如下所示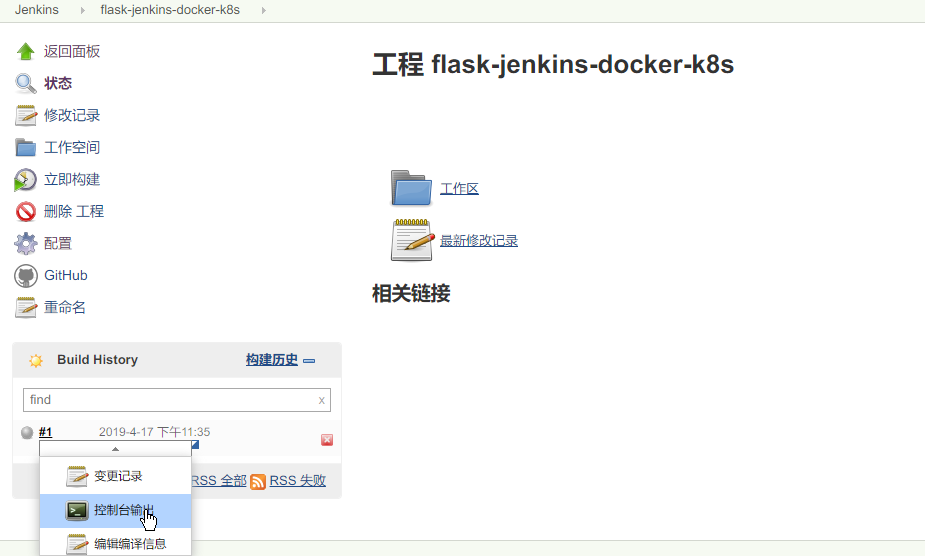
点击控制台输出后显示的日志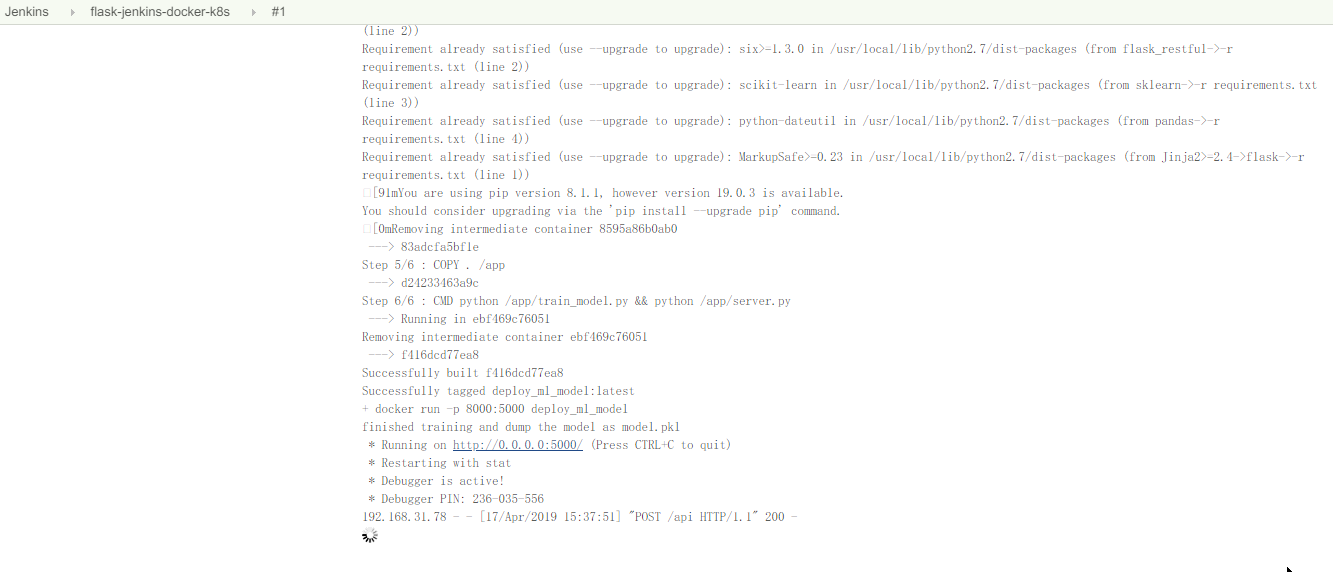
上面提到了触发 jenkins 自动构建的原理,即当代码仓库有更新时,github 会发送 POST 请求给 jenkins,然后 jenkins 会进行自动构建,这种情况下 jenkins 首先需要有一个能够接受 github 的 POST 请求的 url,但是 jenkins 当前是部署在局域网内部的,这时便需要借助 ngrok 这个工具来生成一个 github 能够访问的 url 了
ngrok 的作用就是为局域网内部的机器生成一个 public url,从而使得内部的服务能够被其他机器访问,其基本原理就是 ngrok 在这个访问过程中提供了中转。ngrok 的下载和安装都很简单,可参考上面上面的 ngrok 的官网,这里不再赘述。
由于 jenkins 在本地的端口是 8080,因此通过 ngrok 为 jenkins 生成 public url 如下所示,可以看到生成了 http 和 https 两个类型的地址;最下面显示的是最近的请求情况,可以看到 github 发送了 3 个更新的 POST 请求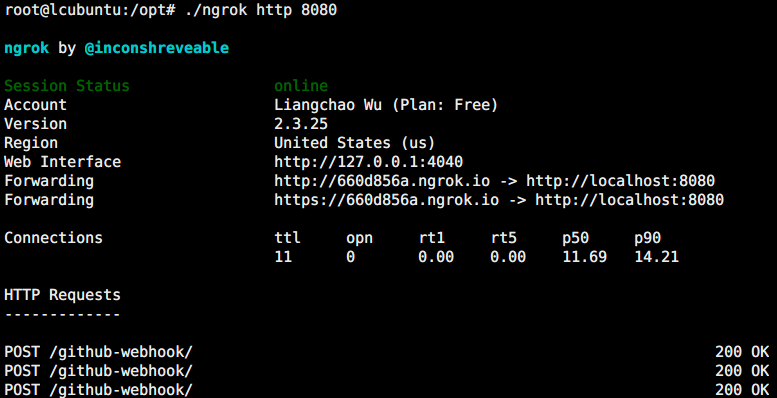
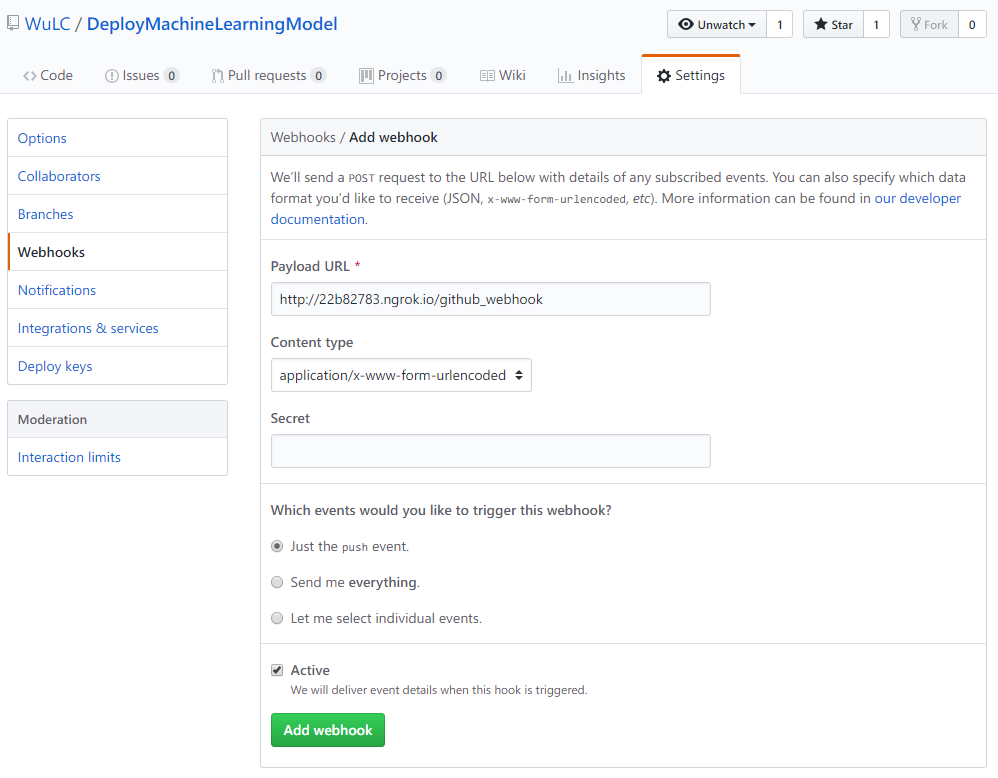
得到 public url 后,需要将其配置到 github 项目的 webhook 中,打开 github 项目的地址,点击 setting 进行设置,设置如下所示,Payload URL 为通过 ngrok 得到的 public url 加上 /github-webhook/ 路径,注意不能省略最后的斜杆,否则会出现 403 No valid crumb was included in the request 的错误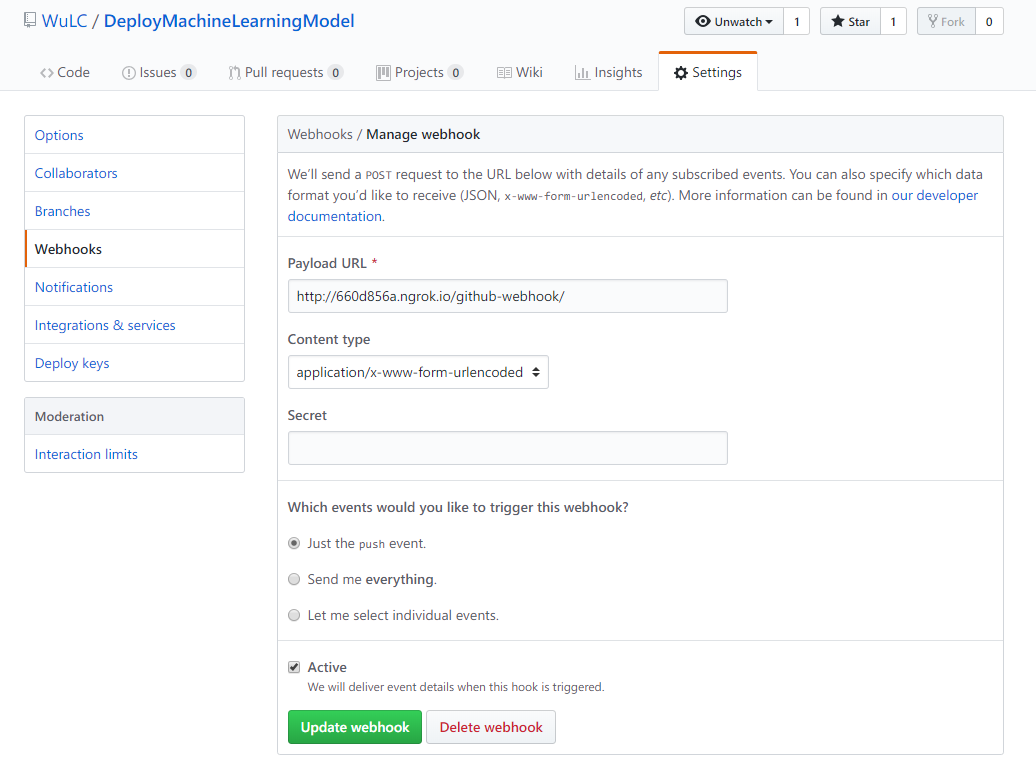
点击 update webhook 后(第一次是 save)后,github 便会向 payload url 发送一个 POST 请求,就是在上上一张图最下方显示的 POST 请求。
这样当 github 的仓库有更新时就会自动触发 jenkins 进行自动构建,但是由于前一个构建任务会一直运行 http server 接受,因此会出现如下图的 already in progress 的问题,新的 build 会被挂起,直到前一个 build 被终止(通过 docker stop) 关掉服务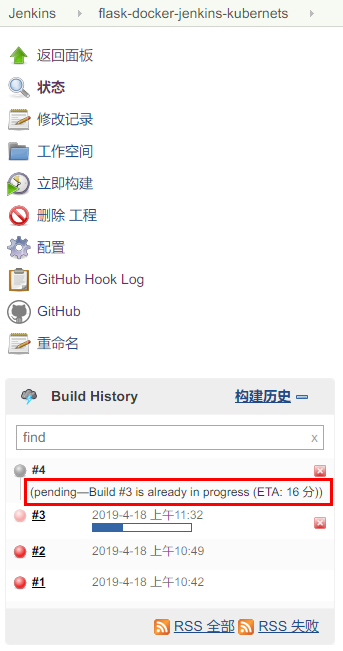
针对这个问题,这个 issue Pushing new commit to existing PR does not stop previous build 给出了通过配置 jenkins 的解决方法,但是我在我配置的环境中找不到这个设置选项,试了几遍后却依然找不到这个配置选项,所以就有了下面的自定义脚本进行自动构建。
而针对这个问题,令一种解决方法是在构建命令时只写 docker build, 每次都只是生成最新的 image;而 docker run 留给人工去启动,但是这样可能就显得不那么自动化了。
自定义脚本进行自动构建
细想一下上面的触发构建过程,本地需要做的是 jenkins 接受 github 发过来的 POST 请求然后启动 docker build 和 docker run, 然后由于已经有 container 在跑了,因此无法决定启动新的构建过程。
那其实我们也可以自己建立一个 http server 接受 github 的 POST 请求,在接受到请求后通过 docker stop 停掉当前正在运行的 container 并开始新的构建过程,而借助前文描述的 Flask,我们可以很容易建立一个接受 POST 请求的 http server,代码如下所示 (见源文件 hook_server.py)1
2
3
4
5
6
7
8
9
10
11
12
13
14
15
16
17# -*- coding: utf-8 -*-
from flask import Flask, jsonify
import subprocess
app = Flask(__name__)
def rebuild():
print('new commits to github repository')
## subprocess.run can just deal with the first change
## since it stuck in it, use popen instead
# subprocess.run(['sh', 'build_and_run.sh'])
subprocess.Popen(['sh', 'build_and_run.sh'])
return jsonify('got it')
if __name__ == '__main__':
app.run(debug=True, host='0.0.0.0', port=8081)
为了保持一致性,这里的路径也选择为 /github_webhook, 为了简单起见,处理的函数只是接受请求,没有对 POST 请求做进一步的解析,接收到命令后通过 subprocess 新创建一个进程执行重新构建并运行 docker image 的脚本 build_and_run.sh, 注意这里要使用 subprocess.Popen 而不是 subprocess.run, 因为 subprocess.run 要等命令执行返回才能继续往下执行,而我们启动的服务也是一个 http server。如果使用 subprocess.run 只能在第一次的更新时触发自动构建,之后会一直保持在新创建的进程中而无法处理 github 发过来的新的请求,因此要使用 subprocess.Popen 避免这个问题,两者更详细的区别可参考 What is the difference between subprocess.popen and subprocess.run
上面执行的脚本 build_and_run.sh 的具体内容如下,首先通过 git pull 更新代码,这里项目的代码的本地路径为 "/opt/src/DeployMachineLearningModel/",然后判断当前是否有正在运行的 container,如果有则先 stop,然后再执行构建过程,在构建和运行之间通过 docker image rm(等价于 docker rmi)删除 docker 的 <none>:<none> images, 这些 images 也被称为 dangling images, 是被覆盖的原来的 image,会占用额外的磁盘空间,详细信息可参考 What are Docker <none>:<none> images?。1
2
3
4
5
6
7
8
9
10
11
12
13
14
15
16
# update code
project_dir="/opt/src/DeployMachineLearningModel/"
cd $project_dir && git pull
# build and run with new code
running_container=$(docker ps | grep deploy_ml_model | awk -F ' ' '{print $1}')
if [ -n "$running_container" ]; then
echo "container id not empty, stop it firstly"
docker stop $running_container
else
echo "empty container id"
fi
docker build -t deploy_ml_model .
docker image rm -f $(docker images -f "dangling=true" -q)
docker run -p 8000:5000 deploy_ml_model
同样需要通过 ngrok 映射本地的 http server 到一个 public url 并将 public url 添加到 github 项目的 webhook 中,如下图所示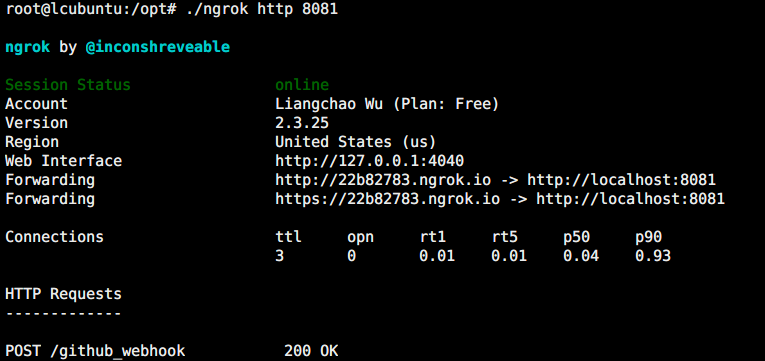
通过 python hook_server.py 运行脚本监听指定的 repository 是否有新的 commit,如果有,则触发运行 build_and_run.sh 脚本,其过程如下所示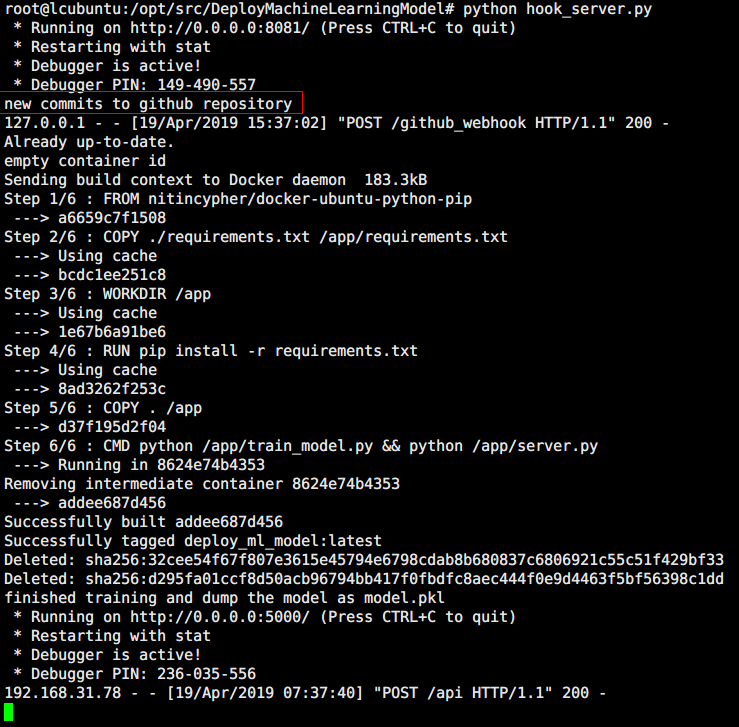
Kubernets
通过上面的三个步骤,已经基本能够形成一个自动化的部署方案了,个人的自娱自乐基本也够了,但是上面还只是单点的服务,缺乏高可用性和伸缩性。
针对这一点,Docker 会经常与 Kubernets 配合使用,Kubernets 是专门为容器化应用的自动部署、拓展和管理的一个分布式系统。Kubernets 的前身是 Google 内部的系统 Brog,而 google 也参与了 Kubernets 的设计,Kubernets + 容器的部署方式应该会是未来的发展趋势,这里主要根据 Learn Kubernetes Basics 总结 Kubernets 的一些经典的使用方式。包括应用的部署,拓展,滚动更新等。
由于实验环境需要多台机器,虽然 Minikube 能够在单机上实现 Kubernets sigle-node 集群,但是根据 Install Minikube ,virtual box 中的虚拟机似乎不支持 VT-x or AMD-v virtualization,因此,这里直接使用 Learn Kubernetes Basics 提供的 shell 环境。
基本架构
Kubernets cluster 是经典主从架构(master-nodes),主(master)负责管理集群,如调度、拓展、更新等,从(nodes) 则负责计算或提供服务,每个 node 通过 Kubelet 这个 agent 与 master 通信,除此之外,node 中还要有容器运行环境如 Docker 或 rkt。基本架构如下图所示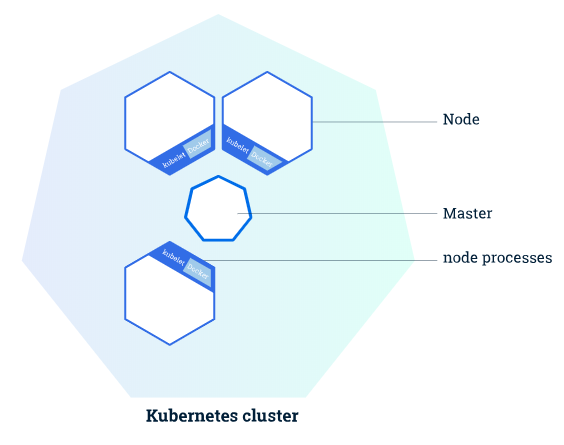
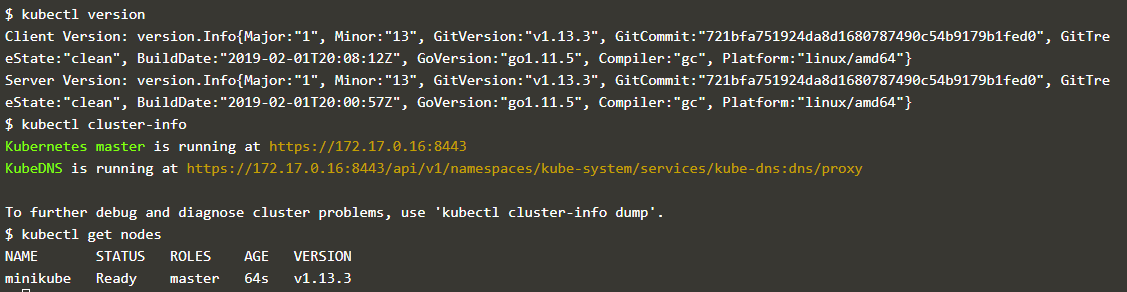
Kubernets 提供的命令行程序 Kubectl(注意与 node 的 Kubelet 区分)能够获取与集群通信,获取集群信息,部署应用等,如下图是通过 kubectl 获取通过 Minikube 启动的 Kubernets 集群的一些信息
- kubectl cluster-info:提供 web 界面查看应用的具体信息
- kubectl nodes:显示所有的 nodes 的信息
部署 (deployment)
部署应用到 Kubernets 集群时,需要构建好要运行的 docker image 的路径,部署使用的也是命令行程序 kubectl,命令是 kubectl run NAME --image=image_url, NAME 是指定的应用的名称,--image 则是指定的 image 的 url,通过 kubectl get deployments 可以看到当前部署的应用,如下图所示
在 Kubernets cluser 中启动了应用后,外部网络是无法直接访问这个应用的,这点跟 Docker 有点相似,需要做映射,但是为了调试的便利性,kubectl 提供了 kubectl proxy 这个命令,相当于把 Cluster 内部的地址映射到本地机器,启动之后可通过本机访问 Kubernets cluser 内部 的应用。如下图所示是访问上面启动的应用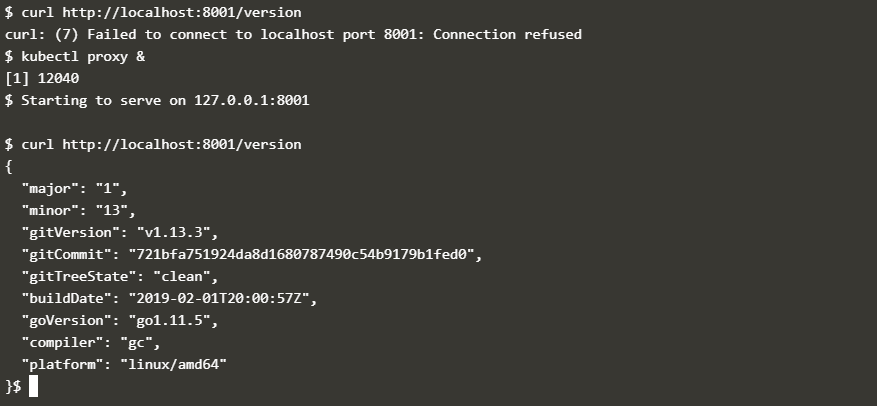
Pods
上面通过 kubectl 进行部署后,Kubernets 会在 node 中创建了 Pod 来容纳 container,一个 node 中可能有多个 pod,Kubernetes 的 master 会根据 node 的资源情况在不同 node 中分配 pod;pod 是 container 和 其所包含的资源的机器,其定义如下,
A Pod is a Kubernetes abstraction that represents a group of one or more application containers (such as Docker or rkt), and some shared resources for those containers. Those resources include:
- Shared storage, as Volumes
- Networking, as a unique cluster IP address
- Information about how to run each container, such as the container image version or specific ports to use
Pod 相当于应用的 “逻辑主机”,而 a group of containers 值得是一个应用中有若干个联系紧密的 container 协作,这些 containers 具有相同的 IP。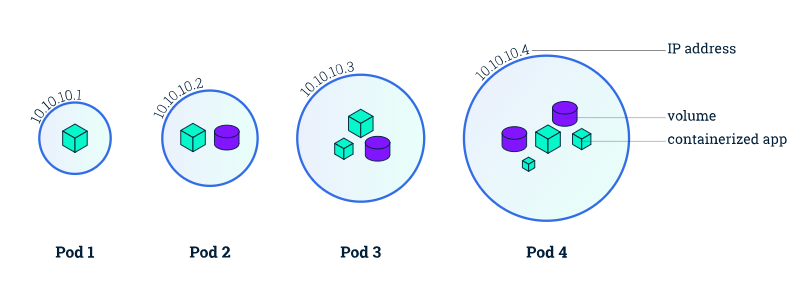
除了 kubectl run, kubectl 常用的命令一下这些
- kubectl get:列出当前系统的资源(pods、nodes 等),后面跟着
- kubectl describe:列出资源的详细信息
如下是通过这两条命令获取前面部署的应用的 pod 信息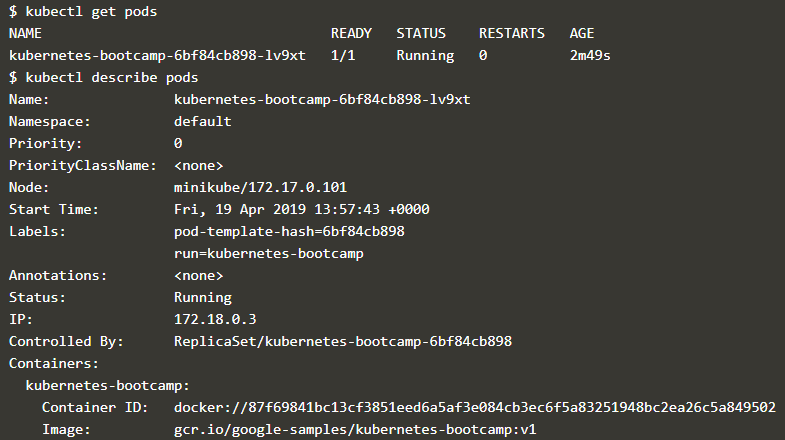
下面的命令则是查看 pod 的日志信息在 pod 中的 container 执行命令,通过命令 export POD_NAME=$(kubectl get pods -o go-template --template '{ {range .items} }{ {.metadata.name}}{ {"\n"}}{ {end}}') 能够获取当前的 pod name
kubectl logs $POD_NAME:打印 pod 中的 container 的日志信息kubectl exec $POD_NAME: 在 pod 中的 container 执行命令
下面首先通过命令获取了 pod 的名称,然后通过 pod 的名称查看其日志并执行命令,执行效果如下所示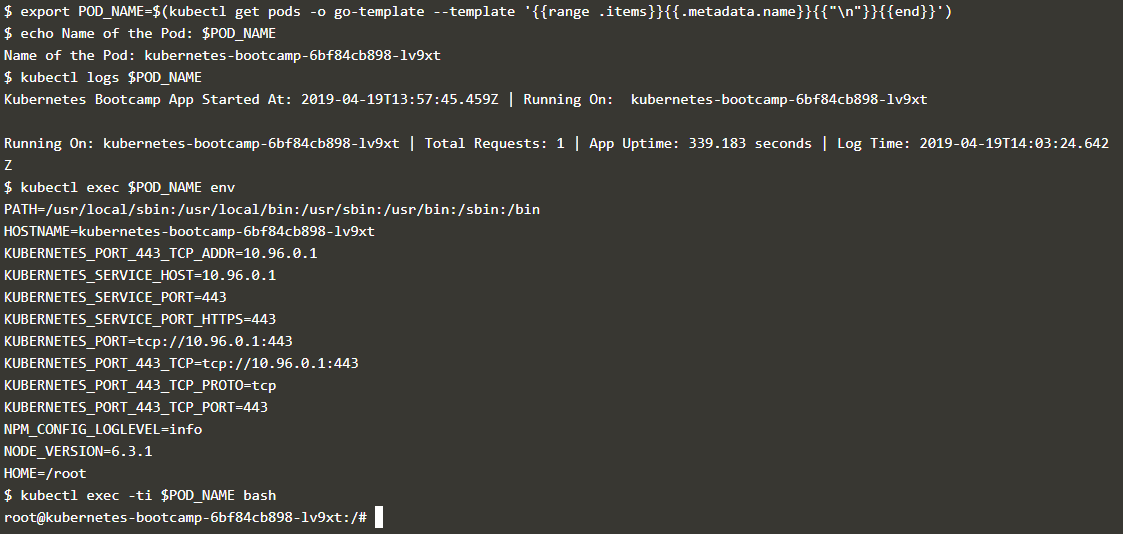
Service
Service 可以说是比 Pod 更高一级的概念,假设部署某个应用时指定其 replicas 的数量是 3,那么就会有 3 个相互独立的 pods,每个 pod 都有自己的 ip,,而 service 就是这些 pods 的集合。Service 管理着这些 pod 的失败重启等,从而向上提供 Pod 的抽象;service 的概念如下图所示
关于 service 的定义如下
A Service in Kubernetes is an abstraction which defines a logical set of Pods and a policy by which to access them
除了 pods,service 中还有一项是 policy,指的是让 cluster 内部的 pod 供外界进行访问的方式,service 可设置的访问方式有下面四种
- ClusterIP (default) - Exposes the Service on an internal IP in the cluster. This type makes the Service only reachable from within the cluster.
- NodePort - Exposes the Service on the same port of each selected Node in the cluster using NAT. Makes a Service accessible from outside the cluster using
<NodeIP>:<NodePort>. Superset of ClusterIP.- LoadBalancer - Creates an external load balancer in the current cloud (if supported) and assigns a fixed, external IP to the Service. Superset of NodePort.
- ExternalName - Exposes the Service using an arbitrary name (specified by externalName in the spec) by returning a CNAME record with the name. No proxy is used. This type requires v1.7 or higher of kube-dns.
通过 kubectl expose 能够让集群内部的 service 供外界访问,如下指定的访问方式是 NodePort, kubernets 默认会启动一个 keubernets 服务,就是第一条 kubectl get services 所显示的内容,而经过 kubectl expose 的服务也会出现在其中,内部端口 8080 被映射为了外部的 32066 端口,通过外部 ip(命令中的 minikube ip) 和 32066 端口便能访问内部的服务。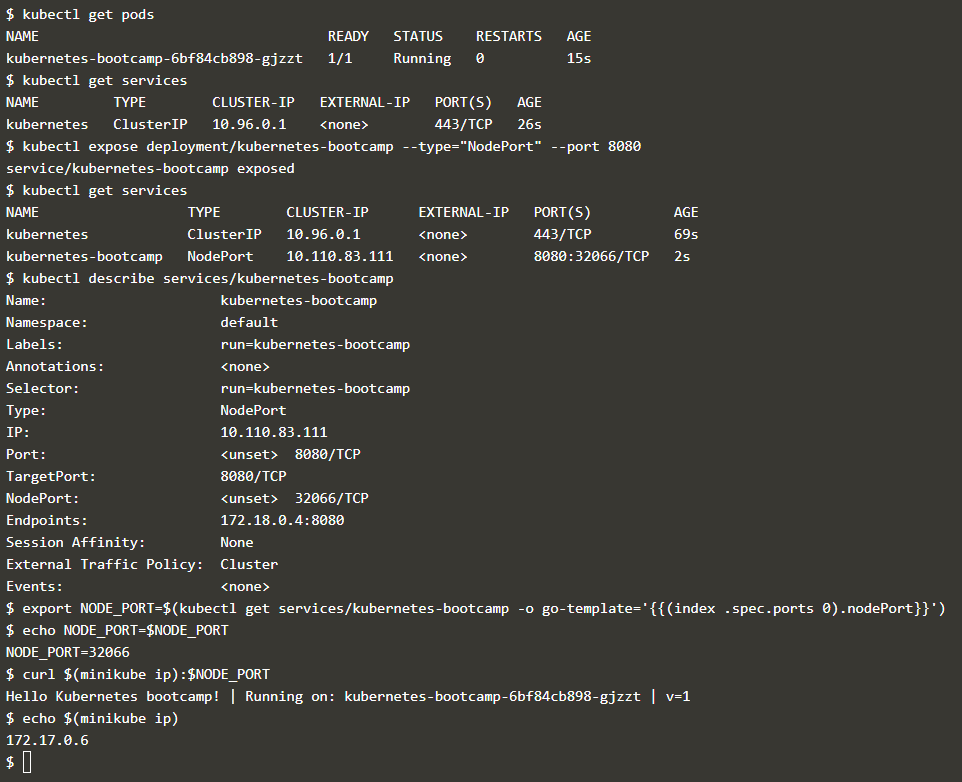
Service 通过 Labels 和 Selectors 来区分同一个 service 中的不同 pod,label 就是一系列的 key-value 对,label 可结合具体的应用场景进行使用,如区分开发、测试和生产环境的 pod;区分同一个 pod 的不同版本等。
部署时每个 pod 会被自动分配一个 label;通过 kubectl describe deployment 查看其对应的 label,也可以在 kubectl get 查看 pod 或 services 的信息时通过 -l 参数指定具体的 pod 或 service,如下图所示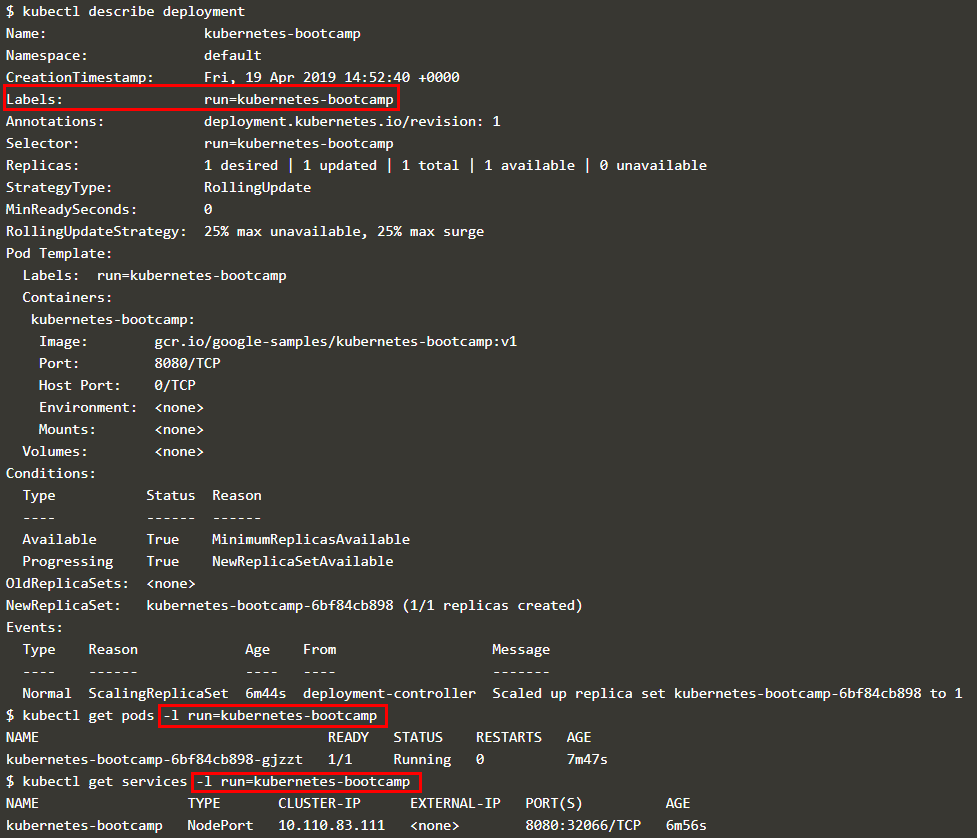
通过 kubectl label 可更改 pod 的 label,如下图所示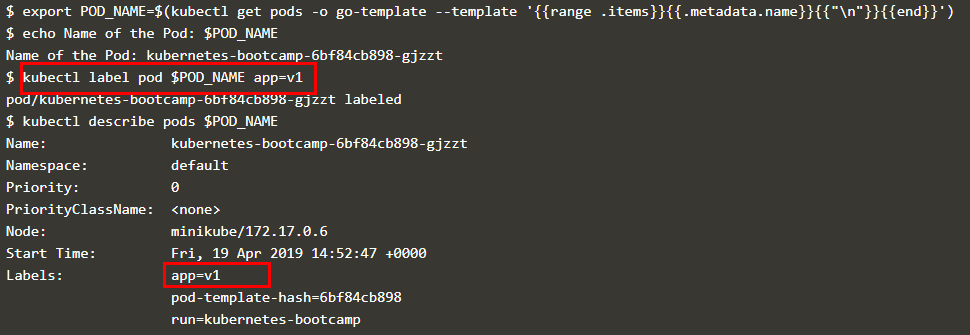
可以根据 label 删除 service,此时虽然外部无法访问 pod,但是集群内部的 pod 仍然在运行,如下图所示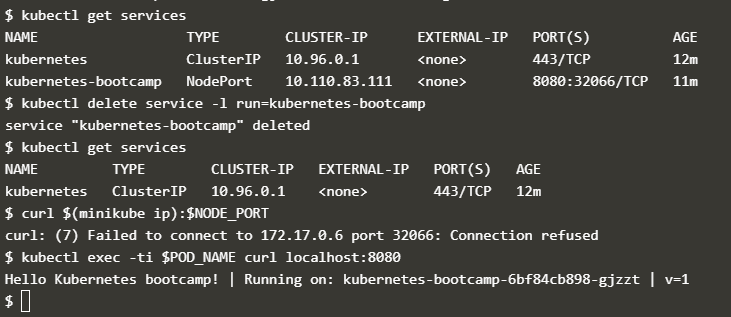
伸缩性 (scaling)
伸缩性就是改变运行同一个 image 的 pods 的数量,如下图所示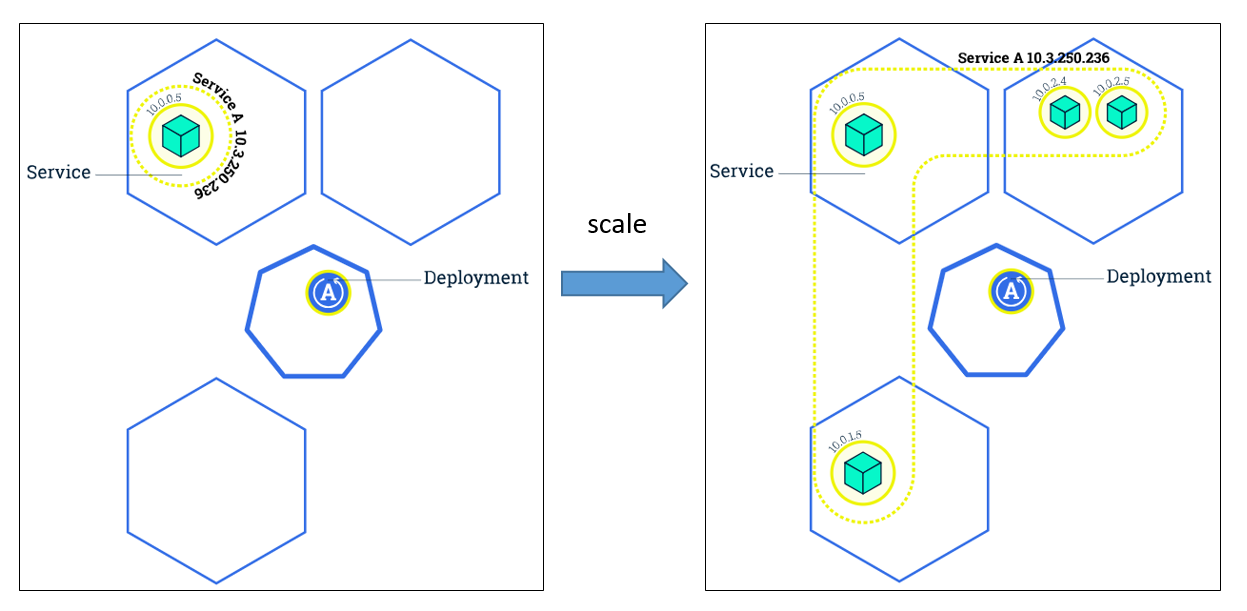
可以通过 kubectl scale 命令指定 replica 的数量,也可以自动伸缩,如下图所示是将原来只有一个 pod 的 deployment 拓展到 4 个 pod, 从 kubectl get deployments 可以看到当前 deployment 可用的 pod 的数量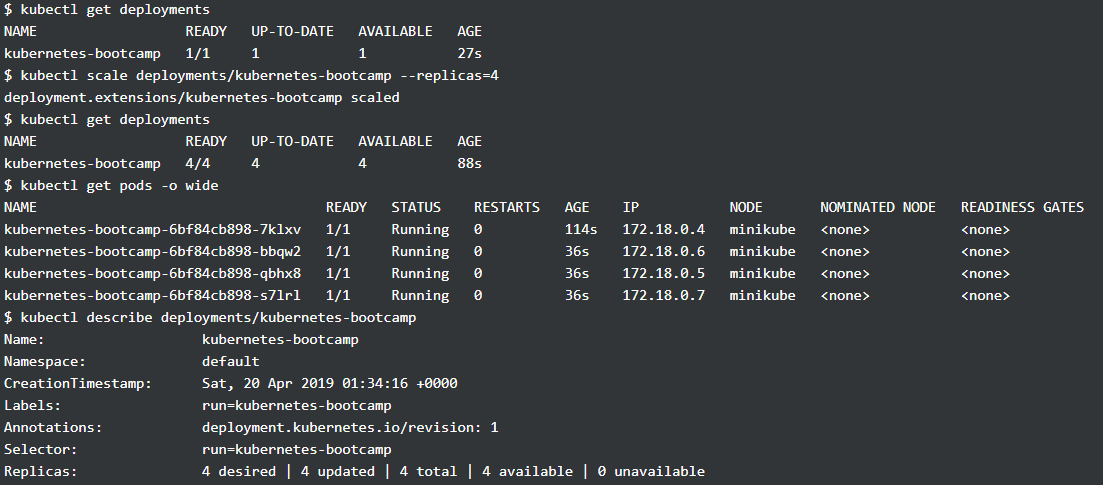
而有了多个 pod, service 就要决定如何分配访问这些 pods 的流量,上面提到的 service 设置的访问方式 LoadBalancer 就是在这里使用 (需要注意的是 NodePort 和 LoadBalancer 是可以共存),通过下面访问多次的结果,可以看到每次访问的 pod 都不一样,从而实现了负载均衡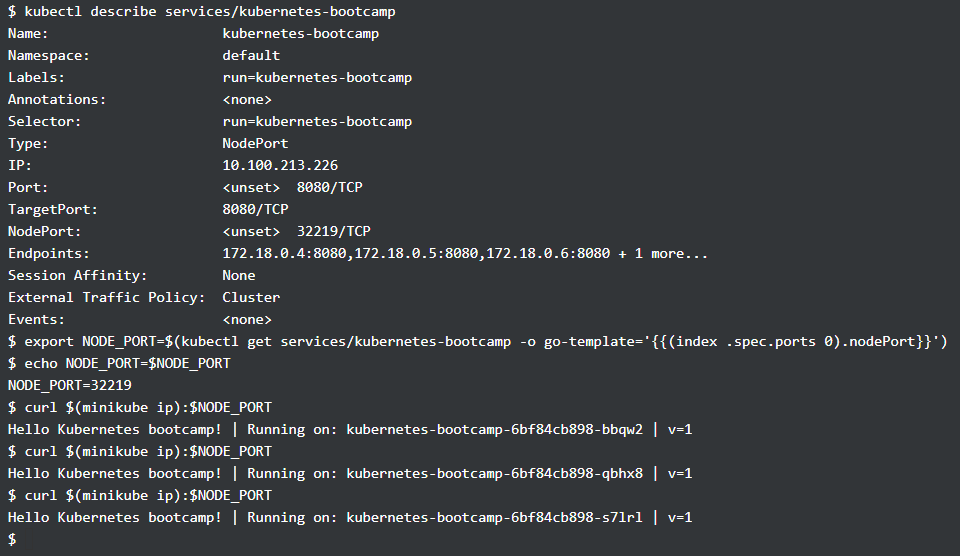
滚动更新 (rolling updates)
有了多个 pods,在更新 images 时便可以进行 rolling update,即不是一次性地 stop 所有 pods 然后同时进行更新,而是先停掉部分的 pods,然后进行更新,并根据这个方法更新所有的 pods。如下图所示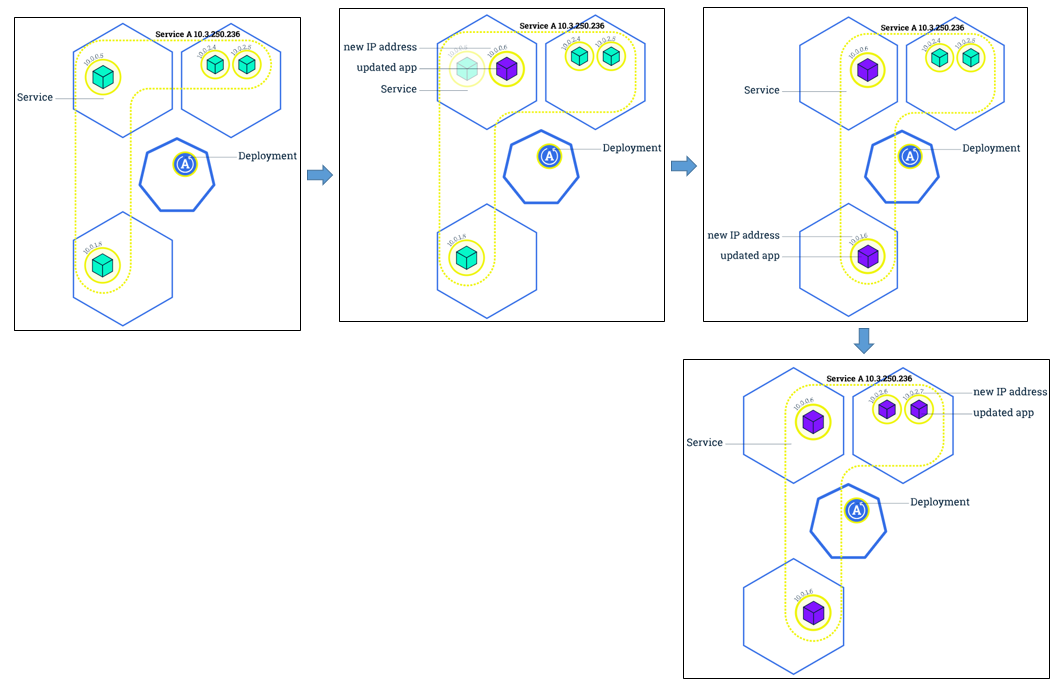
这样的好处是在更新时不会让服务停止,如下图所示是更新前 pod 的一些信息,可以看到此时 image 的版本均为 v1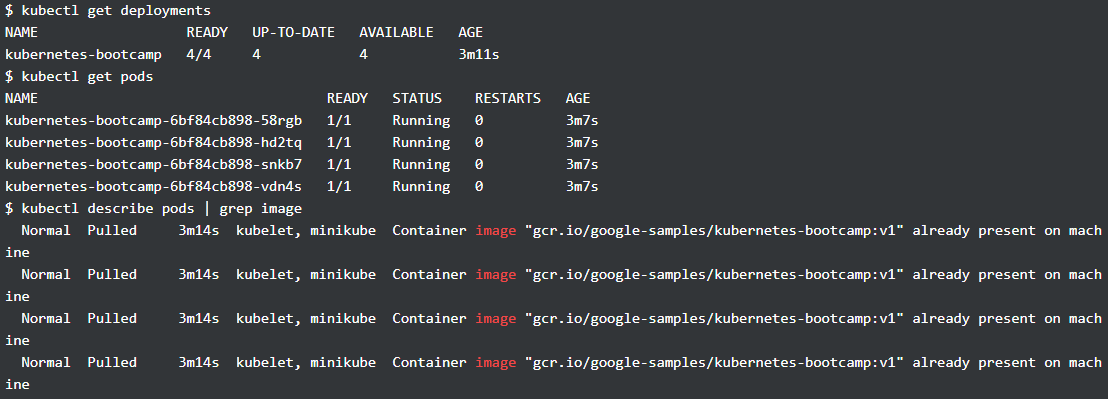
下面通过 kubectl set 更新上图所示的 deployment,使用了 v2 版本的 image,在 kubectl set 后,可以看到原来的 pod 处于 terminating 的状态,且多了四个新的 pod(可通过 AGE 区分),随着 update 完成,只有新的 pods 在运行,image 版本均变为了 v2,通过 kubectl rollout status 可以查看更新的情况。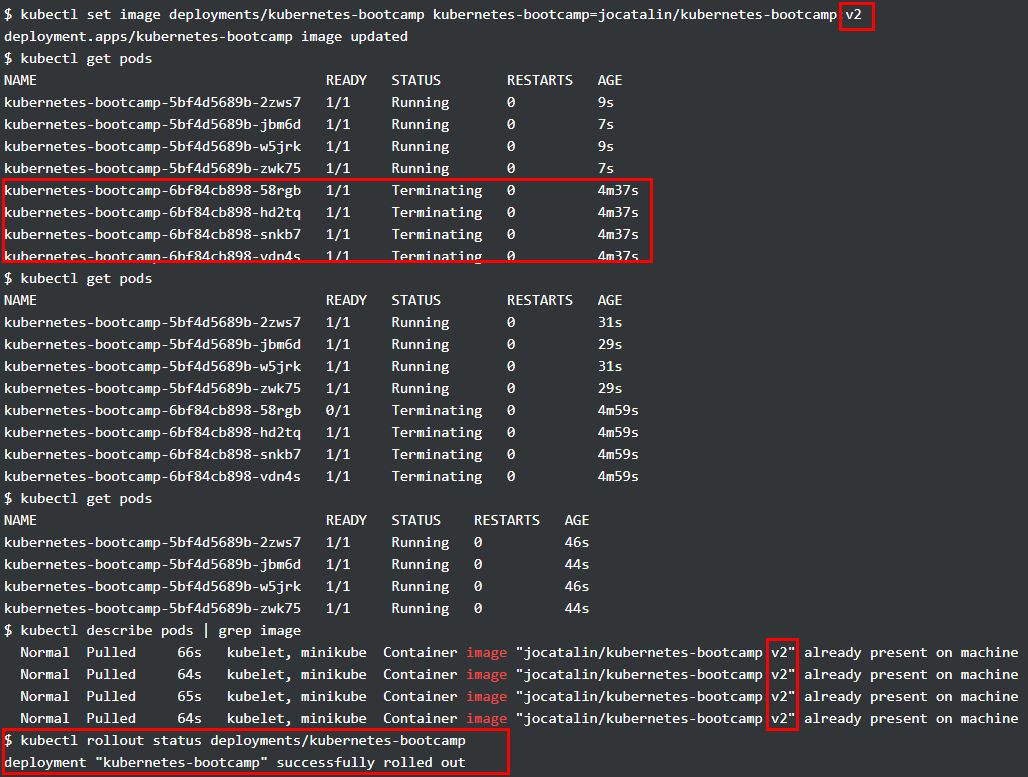
除此之外, Kubernets 中的每次更新都有版本记录,可进行回滚,如下图更新了一个不存在的 image,从 kubectl get pods 可以看到新的 pod 的状态是 ErrImagePull,通过 kubectl rollout undo 即可进行版本的回滚,最后所有 pods 的状态均恢复正常,image 版本均为 v2,如果再进行一次 kubectl rollout undo,那么 image 版本就变为 v1 了。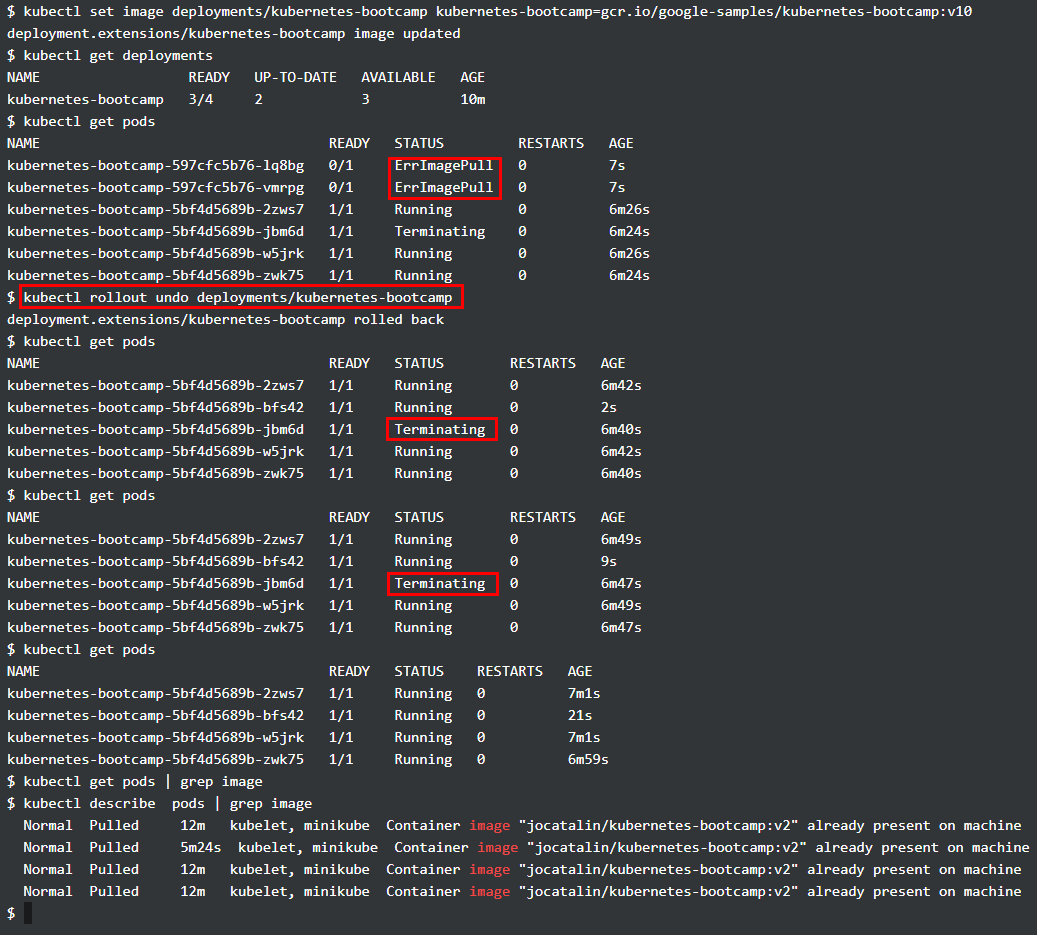
总结
本文主要介绍了部署机器学习模型的一种方式,通过 Flask,Docker,Jenkins 和 Kubernets 共同构建。Flask 负责加载模型并提供 RESTful api,Docker 负责把程序及其依赖的环境打包成镜像,Jenkins 则可以在代码仓库有更新时触发自动构建,生成最新的 image,本文也通过自定义脚本的方式来实现了这一简单功能,但是 Jenkins 是一个功能非常丰富的工具,在项目更大更复杂时,采用 Jenkins 会更加方便。
通过 Flask,Docker 和 Jenkins 可以实现基本的自动化部署,但是此时的服务是单点的,不具备容灾性和伸缩性,通过 Kubernets 则可以较好地解决这个问题,只需要提供打包好的镜像,Kubernets 便能够提供伸缩性服务,滚动更新,回滚等操作。